 , the Rectangle tool
  , and the Pen tool
  .
.Prep your canvas the same as in the swimsuit tut. Open a new image, raster background, size 400 x 400. Fill the background with light grey. Turn on Grid view and set the grids to 20, grid color to medium grey. Set the background color to #156826, foreground to null.
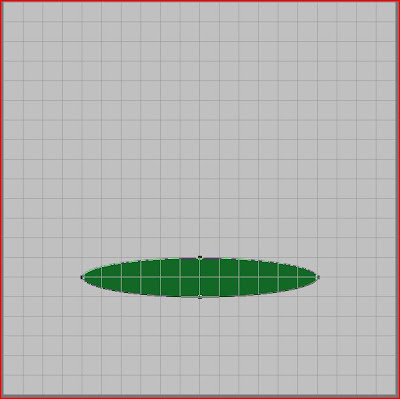
Activate the ellipse tool by pressing the letter Q on the keyboard. We're going to build our hat from the bottom up, so we'll start with the brim. Count in 4 grid square from the left and 7 or so from the bottom of the canvas. Draw out your shape like this

We're going to shape the brim a bit now to give it some character. Right click on one of the nodes and choose Convert to Path. Activate the pen tool by hitting the letter V on your keyboard. Make sure the mode is set to edit. You can do this by again right clicking on one of the nodes and choosing Edit mode.
Click on the left node and pull it up one grid line. Repeat on the right. Now pull the bottom node down one grid. Click apply and the brim is done.
 Doesn't look like much yet, does it? Let's keep going. Next up is the crown. For this part we'll use the rectangle tool. Activate the tool by pressing the letter G.
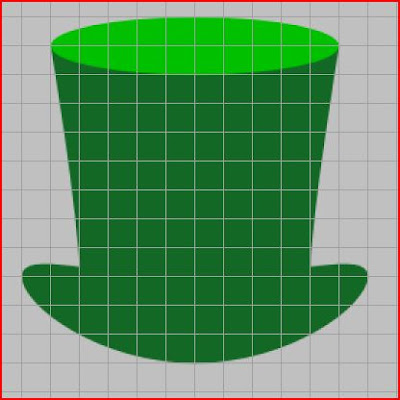
Count down 5 grids from the top of the canvas and in 5 grids from the left. Click and drag out your rectangle, stopping just below the top of the brim. Right click on one of the nodes and Convert to Path. Switch over to the pen tool (V). Again, make sure you're in Edit mode. Grab the lower left node and pull it in one grid. Repeat on the right.
 Right click on the lower left node again, and change the Node type to curve after (remember the clockwise rule?) Move the curve handle just to the right until it snaps up against the grid line. Next, right click on that same node and select Node type, curve before. Drag this handle down until it snaps to the grid line below. Repeat on the lower right node, reversing each step. Click apply.
 Next we'll make the top of the hat to give it some dimension. Activate the Ellipse tool (Q). Change the background color to #00c000. Starting one grid above the crown, click and draw out the ellipse the width of the crown and two grids high. Right click on any node and Convert to Path. Click apply. How easy was that?
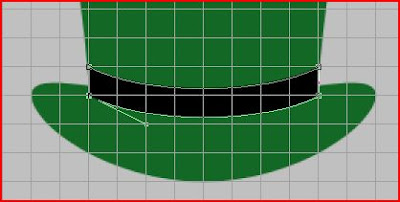
Just a couple more steps and we're done. Let's add a hat band. Change the background color to black and activate the Rectangle tool (G). In the grid area where the crown and brim meet, draw out a rectangle the width of the crown and one grid high. Right click, convert to path. Switch to the pen tool (V).
I'm going to take a coffee break here and leave you on your own for a minute. Let's see how much you've learned. Using the node curves, shape the hat band to follow the bottom of the brim.
...
...
...
...So, how'd you do? Your hat band should look like this.

If you turn off the grid right now, you'll see that there's still a tiny bit of the crown peeking out from behind the hatband on the sides. You need to nudge the top nodes of the band out. With the snap to grid turned on, however, you can't just nudge. The nodes will look for the next gridline to snap onto. You could take the time to go up and turn off grid view, make the adjustment, and turn grid view back on. But there's an easier way! Hold down the Alt key while you move your nodes and it will temporarily release the 'snap to' function. So go ahead and do that now. When you're happy with the band, click apply.
And lastly, we'll add a buckle to the hatband. Change your foreground color to #ffff80 and set the background to null. Using the Rectangle tool (G), draw out your buckle roughly center of the hat band. Adjust the line width to about 7 or whatever looks best to you. Convert to Path. Mine didn't line up well with the band, so I switched to the pen tool and held down the Alt key while dragging to fine tune the placement.
Once you're finished tweaking the buckle, turn off the grid view to see how it all looks. Pretty good, no? Save as a .pspimage and you're finished!

Mel


awesome Tutorial thank you for sharing
ReplyDeleteWeeeee..........can't wait to try this one out.
ReplyDeleteThank you for this fantastic tut.
Smiles,
Colleen