Wow. Are there any truer words? This has been a tough year. Changes and losses seemed to come faster than I could process them. A little bit of midlife crisis in the mix as I get closer to another birthday and the dreaded 'middle age'. I pulled back from nearly everything, including my friends, for which I'm so very sorry. I was restless, bored, and pretty lost as to what comes next.
So, what does come next? Apparently, a baby. Yep. I'm pregnant. 12 weeks as of this posting. At 38. I have a preteen, for cripes sakes! To say this was an unplanned event is a major understatement! I guess I'm still in a bit of shock. Instead of planning a family vacation to the beach for next spring, I'll be preparing for the arrival of a new little one and wondering how I'm going to juggle everything. It should be easier the second time around, right? So why does it seem a hundred times more complicated? I'm thrilled, excited, and worried all at the same time. We're blessed with a second chance at loving and nurturing a new life. On the flip side, the idea of starting all over again is mindboggling.
"Life is what happens while we're busy making plans." - John Lennon
Sunday, October 25, 2009
Tuesday, August 4, 2009
Vector tutorial - St. Pat's Hat
By request, a tutorial for creating a leprechaun top hat. This time, we're going to use the Ellipse tool  , the Rectangle tool
  , and the Pen tool
  .
.
Prep your canvas the same as in the swimsuit tut. Open a new image, raster background, size 400 x 400. Fill the background with light grey. Turn on Grid view and set the grids to 20, grid color to medium grey. Set the background color to #156826, foreground to null.
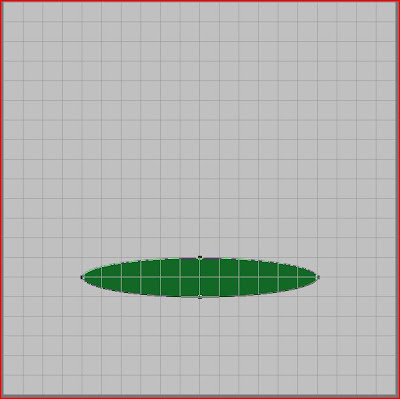
Activate the ellipse tool by pressing the letter Q on the keyboard. We're going to build our hat from the bottom up, so we'll start with the brim. Count in 4 grid square from the left and 7 or so from the bottom of the canvas. Draw out your shape like this
We're going to shape the brim a bit now to give it some character. Right click on one of the nodes and choose Convert to Path. Activate the pen tool by hitting the letter V on your keyboard. Make sure the mode is set to edit. You can do this by again right clicking on one of the nodes and choosing Edit mode.
Click on the left node and pull it up one grid line. Repeat on the right. Now pull the bottom node down one grid. Click apply and the brim is done.
 Doesn't look like much yet, does it? Let's keep going. Next up is the crown. For this part we'll use the rectangle tool. Activate the tool by pressing the letter G.
Count down 5 grids from the top of the canvas and in 5 grids from the left. Click and drag out your rectangle, stopping just below the top of the brim. Right click on one of the nodes and Convert to Path. Switch over to the pen tool (V). Again, make sure you're in Edit mode. Grab the lower left node and pull it in one grid. Repeat on the right.
 Right click on the lower left node again, and change the Node type to curve after (remember the clockwise rule?) Move the curve handle just to the right until it snaps up against the grid line. Next, right click on that same node and select Node type, curve before. Drag this handle down until it snaps to the grid line below. Repeat on the lower right node, reversing each step. Click apply.
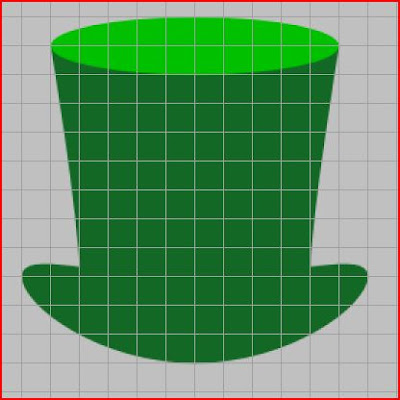
 Next we'll make the top of the hat to give it some dimension. Activate the Ellipse tool (Q). Change the background color to #00c000. Starting one grid above the crown, click and draw out the ellipse the width of the crown and two grids high. Right click on any node and Convert to Path. Click apply. How easy was that?
Just a couple more steps and we're done. Let's add a hat band. Change the background color to black and activate the Rectangle tool (G). In the grid area where the crown and brim meet, draw out a rectangle the width of the crown and one grid high. Right click, convert to path. Switch to the pen tool (V).
I'm going to take a coffee break here and leave you on your own for a minute. Let's see how much you've learned. Using the node curves, shape the hat band to follow the bottom of the brim.
...
...
...
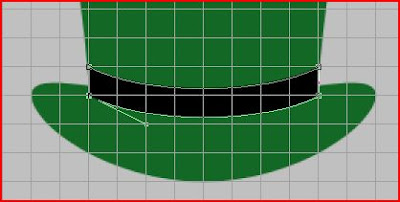
...So, how'd you do? Your hat band should look like this.
If you turn off the grid right now, you'll see that there's still a tiny bit of the crown peeking out from behind the hatband on the sides. You need to nudge the top nodes of the band out. With the snap to grid turned on, however, you can't just nudge. The nodes will look for the next gridline to snap onto. You could take the time to go up and turn off grid view, make the adjustment, and turn grid view back on. But there's an easier way! Hold down the Alt key while you move your nodes and it will temporarily release the 'snap to' function. So go ahead and do that now. When you're happy with the band, click apply.
And lastly, we'll add a buckle to the hatband. Change your foreground color to #ffff80 and set the background to null. Using the Rectangle tool (G), draw out your buckle roughly center of the hat band. Adjust the line width to about 7 or whatever looks best to you. Convert to Path. Mine didn't line up well with the band, so I switched to the pen tool and held down the Alt key while dragging to fine tune the placement.
Once you're finished tweaking the buckle, turn off the grid view to see how it all looks. Pretty good, no? Save as a .pspimage and you're finished!

Mel
 , the Rectangle tool
  , and the Pen tool
  .
.Prep your canvas the same as in the swimsuit tut. Open a new image, raster background, size 400 x 400. Fill the background with light grey. Turn on Grid view and set the grids to 20, grid color to medium grey. Set the background color to #156826, foreground to null.
Activate the ellipse tool by pressing the letter Q on the keyboard. We're going to build our hat from the bottom up, so we'll start with the brim. Count in 4 grid square from the left and 7 or so from the bottom of the canvas. Draw out your shape like this

We're going to shape the brim a bit now to give it some character. Right click on one of the nodes and choose Convert to Path. Activate the pen tool by hitting the letter V on your keyboard. Make sure the mode is set to edit. You can do this by again right clicking on one of the nodes and choosing Edit mode.
Click on the left node and pull it up one grid line. Repeat on the right. Now pull the bottom node down one grid. Click apply and the brim is done.
 Doesn't look like much yet, does it? Let's keep going. Next up is the crown. For this part we'll use the rectangle tool. Activate the tool by pressing the letter G.
Count down 5 grids from the top of the canvas and in 5 grids from the left. Click and drag out your rectangle, stopping just below the top of the brim. Right click on one of the nodes and Convert to Path. Switch over to the pen tool (V). Again, make sure you're in Edit mode. Grab the lower left node and pull it in one grid. Repeat on the right.
 Right click on the lower left node again, and change the Node type to curve after (remember the clockwise rule?) Move the curve handle just to the right until it snaps up against the grid line. Next, right click on that same node and select Node type, curve before. Drag this handle down until it snaps to the grid line below. Repeat on the lower right node, reversing each step. Click apply.
 Next we'll make the top of the hat to give it some dimension. Activate the Ellipse tool (Q). Change the background color to #00c000. Starting one grid above the crown, click and draw out the ellipse the width of the crown and two grids high. Right click on any node and Convert to Path. Click apply. How easy was that?
Just a couple more steps and we're done. Let's add a hat band. Change the background color to black and activate the Rectangle tool (G). In the grid area where the crown and brim meet, draw out a rectangle the width of the crown and one grid high. Right click, convert to path. Switch to the pen tool (V).
I'm going to take a coffee break here and leave you on your own for a minute. Let's see how much you've learned. Using the node curves, shape the hat band to follow the bottom of the brim.
...
...
...
...So, how'd you do? Your hat band should look like this.

If you turn off the grid right now, you'll see that there's still a tiny bit of the crown peeking out from behind the hatband on the sides. You need to nudge the top nodes of the band out. With the snap to grid turned on, however, you can't just nudge. The nodes will look for the next gridline to snap onto. You could take the time to go up and turn off grid view, make the adjustment, and turn grid view back on. But there's an easier way! Hold down the Alt key while you move your nodes and it will temporarily release the 'snap to' function. So go ahead and do that now. When you're happy with the band, click apply.
And lastly, we'll add a buckle to the hatband. Change your foreground color to #ffff80 and set the background to null. Using the Rectangle tool (G), draw out your buckle roughly center of the hat band. Adjust the line width to about 7 or whatever looks best to you. Convert to Path. Mine didn't line up well with the band, so I switched to the pen tool and held down the Alt key while dragging to fine tune the placement.
Once you're finished tweaking the buckle, turn off the grid view to see how it all looks. Pretty good, no? Save as a .pspimage and you're finished!

Mel
Tuesday, July 28, 2009
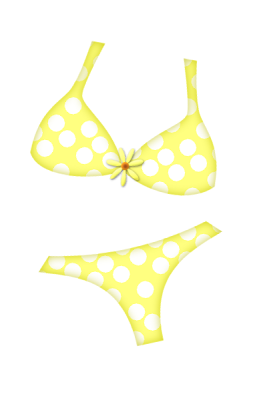
Swimsuit tutorial - bikini
Today we're going to create a swimsuit template using the Pen tool and curves. Once you get comfortable with manipulating anchor points and node types, the creative possibilities are endless. You can create exactly what you want, and not have to spend hours and dollars searching for someone else's creation. My favorite thing about creating my own pieces is that the finished product is mine to do with as I please, no TOU needed! So let's get started.
First, let's prepare the canvas.
Open a new image, raster background, 400px width/600px height.
Fill the background with a light gray color #c0c0c0 (your eyes will thank you!).
Set foreground color to your choosing - a light color works best. Background to null.
Go to View>Change Grid, Guide, and Snap properties. Under current image settings, set the horizontal and vertical to 20 pixels. Set the snap influence to 10.
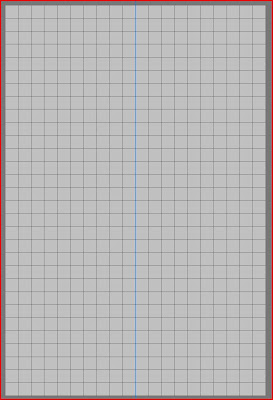
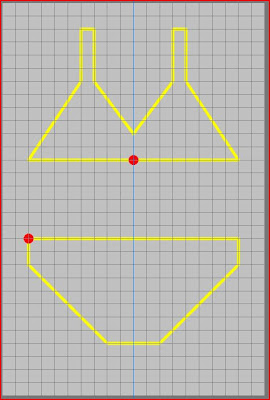
Go to View>View Grid. Then View>Snap to Grid. And finally, go to View>View Guides. Place a guide line vertically at 200px. Your canvas should look like this
Activate the pen tool, choose these settings. Set the line width to 5px. Line style solid. Anti-alias checked.

I swear, there really is a tutorial here! So, let's get busy on that swimsuit. Think of your drawing as a connect the dots. I've found it easier to start with the swimsuit bottom to get a better idea of the placement. Working in a clockwise direction, roughly "sketch" the shape of the swimsuit by clicking along the grid lines to place anchor points. Try to use as few anchors as possible. It makes for a smoother shape. I marked my start and end points in red. When you finish drawing your shape out, right click on the starting anchor, choose Edit>Close.
So, now it's time to start shaping the swimsuit. We're going to do this using the Curve Before and Curve After node types.
Switch the Pen mode to Edit. Beginning with the starting node on the bikini bottom, right click and choose Node type> Curve after. This is the point when the zoom comes in really handy. Although you might not be able to see it all that clearly, there's a handle coming off of the anchor. You want to find the end of that handle. When you place the cursor over the end of the handle, it will change to a plus sign with rotating arrows. Click and drag the arrow straight down until it "snaps" against the grid line below. Still working in a clockwise direction, move to the second anchor and right click, choose Node type. This time select Curve before. Again, drag the end of the handle straight down until it snaps. (The reason I do the clockwise thing is that it makes it easier to remember whether you need the before or after curve. Sometimes you will need both.) This is what you should have now
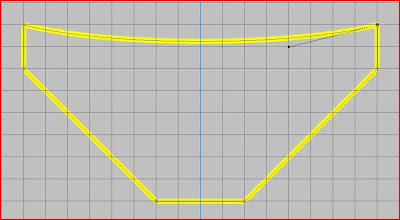
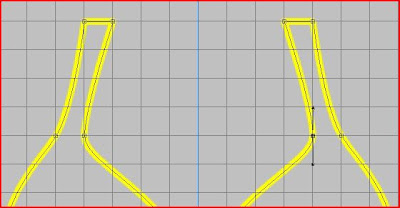
To shape the legs of the suit, click on one of the bottom two anchors. Right click, Node type> is it curve before or after? I'll let you try it and see. You want to pull the handle straight up until you are happy with the curve, like this
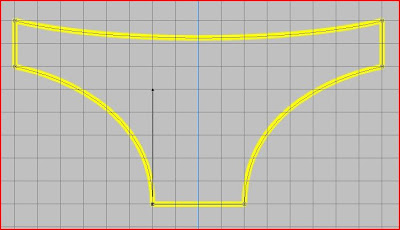
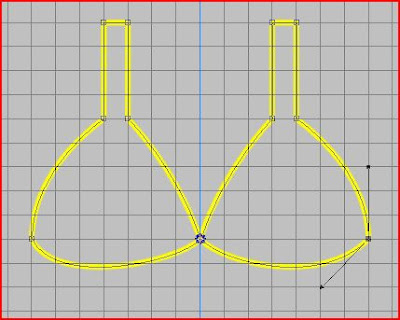
And you have your bikini bottom. Now you can tweak the shape if you want. Spend a little time moving the nodes around a bit to see how it looks. When you are happy with it, move on to the top. This is a little trickier, but still very easy to do.
Just as with the bottoms, click on the nodes, choose the curve direction, and pull the handles out to shape the curves. You can go simple or complex.
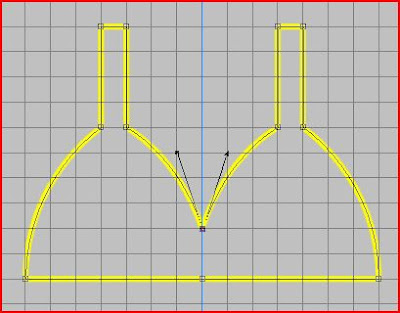

To shape the straps, move the nodes at the top of the cup one grid square toward the outside.

Still working with this group of nodes, select the leftmost node, right click and change the node type to Symmetric. The curve is perfect, so no need to do anything with the handles. Repeat on the node farthest to the right. Select the inner left node, change the node type to Symmetric. Uh oh, it's all squished now. To fix that, grab one of the handles and drag it back to the same vertical line that the node is on. Repeat on the inner right node.
Hang in there, almost finished!
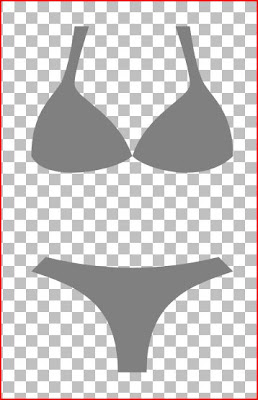
When you are happy with the shape of your suit, you can turn off the grid view. In your color palette, switch the foreground and background. Your suit is now filled with the color you drew the lines with. To save as a template, change the fill color to grey or black by clicking on the plus sign beside the Vector layer and then double clicking on the path. This brings up the Vector property box. Make sure stroke is unchecked. Click on the fill color and make it what you want. Delete the background raster layer. Now you can save as a fully scalable template (.PSPImage) or export as a preset shape.
I would love feedback on this tutorial. I tried to write it from the perspective of someone who is familiar with PSP, but not the pen tool. I hope I haven't bored or confused!
Mel
First, let's prepare the canvas.
Open a new image, raster background, 400px width/600px height.
Fill the background with a light gray color #c0c0c0 (your eyes will thank you!).
Set foreground color to your choosing - a light color works best. Background to null.
Go to View>Change Grid, Guide, and Snap properties. Under current image settings, set the horizontal and vertical to 20 pixels. Set the snap influence to 10.
Go to View>View Grid. Then View>Snap to Grid. And finally, go to View>View Guides. Place a guide line vertically at 200px. Your canvas should look like this

Activate the pen tool, choose these settings. Set the line width to 5px. Line style solid. Anti-alias checked.

I swear, there really is a tutorial here! So, let's get busy on that swimsuit. Think of your drawing as a connect the dots. I've found it easier to start with the swimsuit bottom to get a better idea of the placement. Working in a clockwise direction, roughly "sketch" the shape of the swimsuit by clicking along the grid lines to place anchor points. Try to use as few anchors as possible. It makes for a smoother shape. I marked my start and end points in red. When you finish drawing your shape out, right click on the starting anchor, choose Edit>Close.

So, now it's time to start shaping the swimsuit. We're going to do this using the Curve Before and Curve After node types.
Switch the Pen mode to Edit. Beginning with the starting node on the bikini bottom, right click and choose Node type> Curve after. This is the point when the zoom comes in really handy. Although you might not be able to see it all that clearly, there's a handle coming off of the anchor. You want to find the end of that handle. When you place the cursor over the end of the handle, it will change to a plus sign with rotating arrows. Click and drag the arrow straight down until it "snaps" against the grid line below. Still working in a clockwise direction, move to the second anchor and right click, choose Node type. This time select Curve before. Again, drag the end of the handle straight down until it snaps. (The reason I do the clockwise thing is that it makes it easier to remember whether you need the before or after curve. Sometimes you will need both.) This is what you should have now

To shape the legs of the suit, click on one of the bottom two anchors. Right click, Node type> is it curve before or after? I'll let you try it and see. You want to pull the handle straight up until you are happy with the curve, like this

And you have your bikini bottom. Now you can tweak the shape if you want. Spend a little time moving the nodes around a bit to see how it looks. When you are happy with it, move on to the top. This is a little trickier, but still very easy to do.
Just as with the bottoms, click on the nodes, choose the curve direction, and pull the handles out to shape the curves. You can go simple or complex.


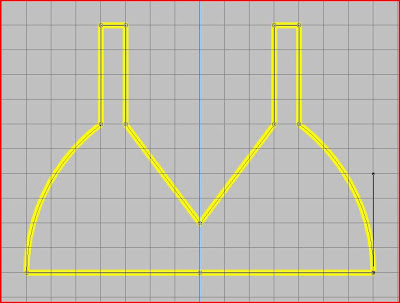
To shape the straps, move the nodes at the top of the cup one grid square toward the outside.

Still working with this group of nodes, select the leftmost node, right click and change the node type to Symmetric. The curve is perfect, so no need to do anything with the handles. Repeat on the node farthest to the right. Select the inner left node, change the node type to Symmetric. Uh oh, it's all squished now. To fix that, grab one of the handles and drag it back to the same vertical line that the node is on. Repeat on the inner right node.

Hang in there, almost finished!
When you are happy with the shape of your suit, you can turn off the grid view. In your color palette, switch the foreground and background. Your suit is now filled with the color you drew the lines with. To save as a template, change the fill color to grey or black by clicking on the plus sign beside the Vector layer and then double clicking on the path. This brings up the Vector property box. Make sure stroke is unchecked. Click on the fill color and make it what you want. Delete the background raster layer. Now you can save as a fully scalable template (.PSPImage) or export as a preset shape.

I would love feedback on this tutorial. I tried to write it from the perspective of someone who is familiar with PSP, but not the pen tool. I hope I haven't bored or confused!
Mel

Friday, July 24, 2009
Summer Fun Blog Train
Welcome to my stop along the Summer Fun train journey. The Scrap Stuff creators are busy at it again. Enjoy!
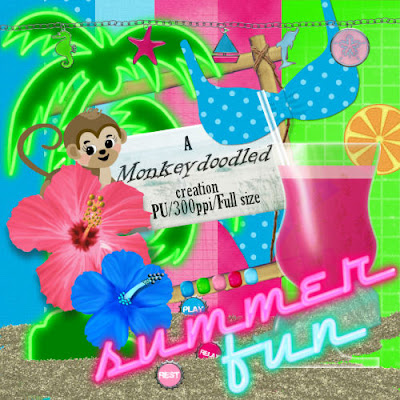
Grab the kit here and the alpha add on here
In case you jumped on at the caboose here, check out the rest of the stops:
http://xelaxscrapfree.blogspot.com/
http://scrapbookingautism.blogspot.com/
http://tygerstidbits.blogspot.com
http://digiscrapsdezines.blogspot.com/
http://lisabitsandbites.blogspot.com/
http://lisasdesigns.blogspot.com/
http://sassysimagination.blogspot.com/
http://specialmooniebrat.blogspot.com/
http://girlfrienddesignz.blogspot.com/
http://foxyladycreation.blogspot.com/
http://creative-scraps.blogspot.com/
http://kimadecreations.blogspot.com/
http://kellyskreation.blogspot.com/
http://artisticleanings.blogspot.com
http://terisscrappinplaytime.blogspot.com/
http://badgirlzstuff.blogspot.com/
http://dolphinlover09.blogspot.com
>> http://monkey-doodles.blogspot.com/ << you are here
Monday, July 13, 2009

Friday, May 29, 2009
California Dreamin'
Or at least I should be dreaming. I'm sitting poolside here at the beautiful Sportsman's Lodge in Studio City, California. It's 5:51 a.m. My time is so messed up! The roommates are still snoozing away. What a great day yesterday was. Up at 3:30 a.m. to catch a 6 o'clock flight to LA. Anyone who knows me knows how much I despise airports and the whole experience. But I have to say, with one glaring exception, it was a wonderful experience. Flight attendants John, Steven, Dennis and Shell were a riot, and we laughed our way through 3 airports and as many time zones. I feel bad that we didn't go back out last night, but a half bottle of wine pretty much demanded that I catch up on the lost sleep. 3 hours sleep in two days does weird things to a person's psyche, y'know?
Today we're off to the Hollywood Walk of Fame and Rodeo Drive. Totally tourist thing to do, no? More later!
Today we're off to the Hollywood Walk of Fame and Rodeo Drive. Totally tourist thing to do, no? More later!
Sunday, April 26, 2009
There's a new kit in town.

A kit-ten! Say hello to Rosi. This little sweetie belongs to my daughter Katie. And a scrap kit! The picture is so cutely framed with elements from Michelle Mills' newest freebie kit. You can grab the scrap kit on her blog at http://www.michellescreativemess.blogspot.com/.
Friday, April 24, 2009
Mother's Day freebie
Here's a sweet and shabby kit for Mother's Day or just a girly girl layout. Eight papers and 21 elements. You may use this kit in almost any way you like. All I ask is that you don't claim my work, or sell the kit/elements as they are. Enjoy and let me see what you've done, 'mkay? Click on the preview for the download link.
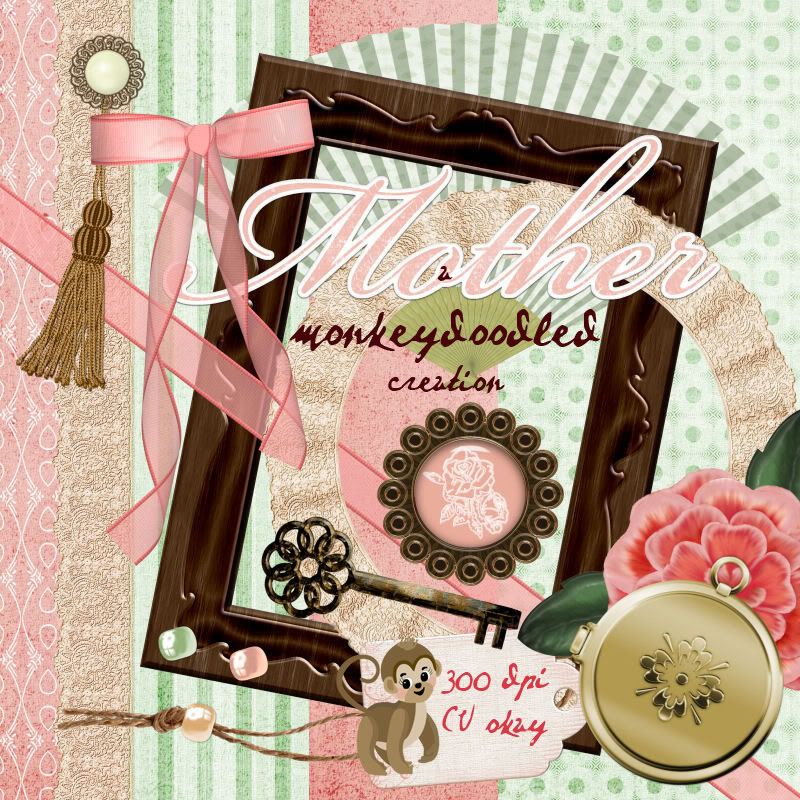
Credit and thanks to Gunhild Storeide, Shawna K, and tutorialqueen.com
Credit and thanks to Gunhild Storeide, Shawna K, and tutorialqueen.com
Sunday, April 5, 2009
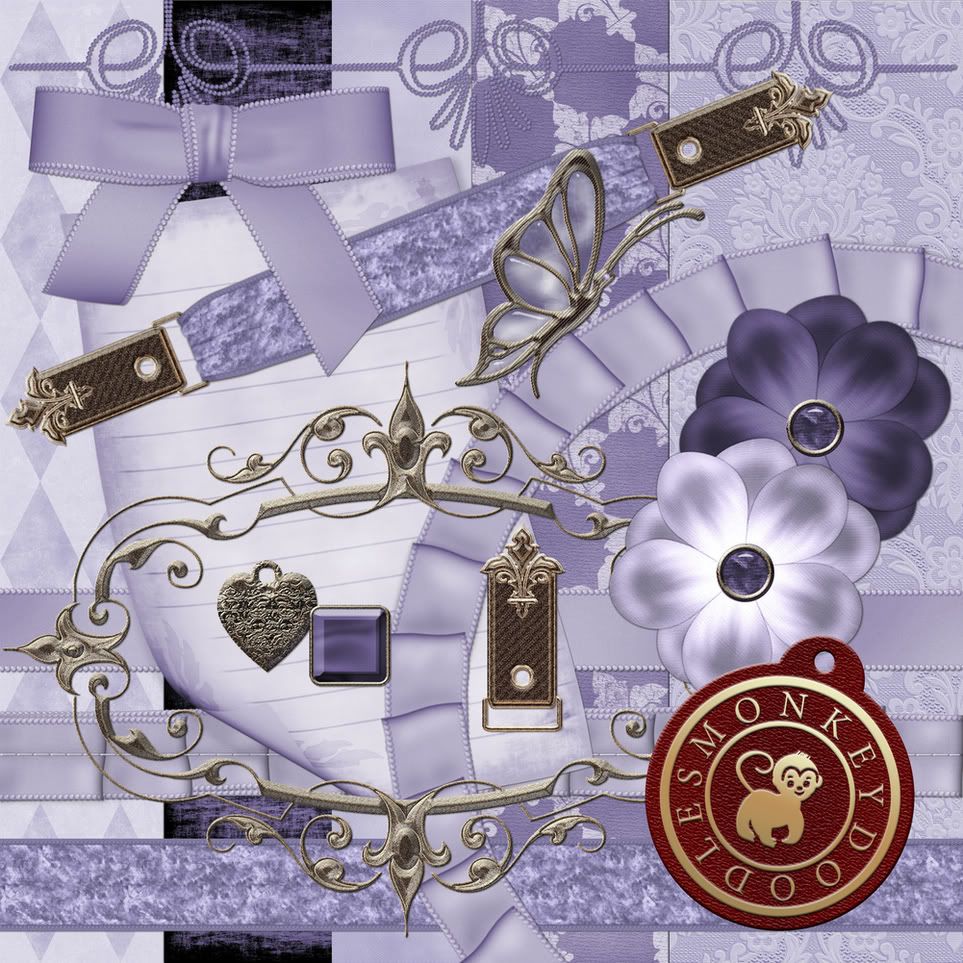
Amethyst Freebie Kit
I think I've been bitten by a creative bug, since it was so much fun doing the blog train. This is a full size kit, suitable for printing to 8 x 8 (300 dpi). Thanks to Shawna for the preset shapes that were the base for some elements. Enjoy! Right click on the image for a larger preview. Left Click to download.
Thursday, April 2, 2009
All Aboard!
Time to jump on the blog train! Welcome to my stop along the journey. The members at Scrapping with PSP and PS Google group have been busy this last month creating goodies to share. I'm so excited to be a part of this fabulous group and this train. I'm also a teeny bit nervous as this is my first "published" work.
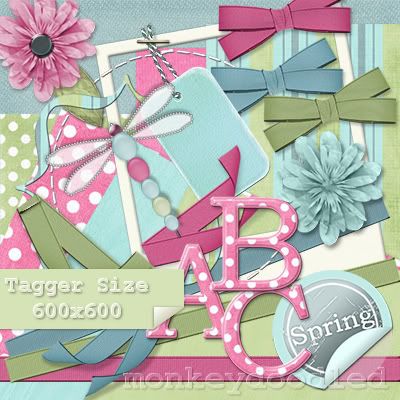
In this TAGGER size kit you'll find
7 - papers, 3 - bows, 3 - folded ribbons, 3 - ribbons, 2 - paper flowers, 1 - paper leaf, 1 - brad, 1 - staple, 1 - stitched circle, 1 - polaroid frame, 1 - bracket frame, 1 - beaded dragonfly, 1 - sticker, 1 - chipboard tag, 1 - 62 piece alpha (upper & lower + numbers 0-9)
Get it here
Check out the rest of the train by visiting these wonderful designers. Grab a comfy seat, a cool beverage of your choice, and have fun!
Shannon's portion of the train may be late
because she has had some personal family issues to deal with.
Please Pray for her Daughter Hannah.
Subscribe to:
Posts (Atom)